Colorful Russian sauerkraut is a blend of many flavors with more ingredients than the basic sauerkraut recipe. It is well worth the extra prep time and ingredients! This is a fermented healing food which it is good for digestion. It is rich in natural probiotics and enzymes. My favorite way of making sauerkraut is to have a “kraut party” and invite a few friends over to chop up the vegetables. We all have Harsch crocks so we make 6-7 times more than just doing a quart here and there. The crock ferments for 6 weeks so the flavors are magnificent.
Shred cabbage in a food processor or finely chop on a cutting board.
Place cabbage in large bowl and sprinkle salt evenly over the cabbage.
Massage the cabbage with your hands to help breakdown the fibers and cellular structure of the cabbage.
Add any additional ingredients and let stand for 2 hours to release juices. Occasionally massage the mixture.
When cabbage is limp, transfer it to a wide mouth quart mason jar.
Pack jar, press down with your fist, plunger or wooden spoon until the cabbage is completely submerged by liquid.
Allow a 1 inch space between top of liquid and lid top.
Cover loosely and allow to sit at room temperature, undisturbed for at least 3-5 days. Transfer to refrigerator. The longer it sits in the refrigerator, the more flavorful it becomes.
This is a great summer salsa! I love dipping with jicama or zucchini slices. The balsamic vinegar adds the final touches. Enjoy it as an appetizer or as a sauce with grilled chicken breasts.
From the beginning of time, man has been eating bone stock or broth. You probably remember your grandmother telling you that chicken soup will make you feel better. Usually, you did feel better. Did you ever wonder why? Chicken broth heals your gut because it is rich in gelatin and it protects and heals the mucosal lining of the digestive tract. It also helps fight infection and reduces joint pain and inflammation. Bone broth is rich in calcium, magnesium, and phosphorous which helps bone grow and repair.
Your soups and stews are so much more nutrient dense if you make them your self. It is a perfect healing food, rich in calcium, magnesium, chondroitin sulfate, protein, and much more. Helpful Hints: A recommended sized pot is 8-10 quarts, ideally 18/8 stainless steel or use your crock pot. A smaller diameter and taller stock pot works the best. Waiting to add the parsley at the end is crucial for maintaining the value of the minerals from the parsley.
1 free-range stewing hen or “layer”, neck and wings cut up OR 3-4 lbs. of boney chicken parts: a combination of necks, backs, ribs, and wings OR the picked carcass of 2 chickens plus chicken feet (optional) NOTE: chicken feet and heads add alot of gelatin, so you can use just them!
4 or more quarts of pure, filtered water to cover all bones
2 T. apple cider vinegar
3 celery stalks
2 carrots
1 bunch parsley, chopped loosely
Instructions
Roast the chicken or pieces for color and to improve the flavor. Place on parchment paper and roast for 30 minutes in a 350 degree oven until slightly browned.
When browned, add chicken or bones with 4 quarts of water. Add 2 T. raw apple cider vinegar and let set for 30 minutes-1 hour.
After chicken-cider-water mixture as set, chop celery, carrots, onions and bay leaves to stock pot. Bring pot to a boil. Skim the scum from the top of the water and discard.
Now turn to low heat. You want to see movement in the pot. This is not a rolling boil; just a simmer.
Cook uncovered for 12-24 hours. This is cumulative time, you may wish to turn off the burner while you sleep or leave the house. Simply leave the pot on the stove, and bring to a boil again when you turn it back on.
Skim any scum and discard.
After the stock has cooked, about 10 minutes before finishing, add fresh parsley. 1-2 Thyme and or oregano can also be added .
Finishing stock:
Pour through a strainer or sieve into a glass or ceramic bowl. Allow to cool on the counter until it reaches room temperature.
Place in the refrigerator to cool completely. After a couple of hours you should have a gelatinous stock with chicken fat on the top. Skim off the fat and use for other cooking and sautéing.
Place stock in containers. If using glass mason jars allow 11/2-2 inches head space on the top. (to avoid jars cracking)
Stock may be frozen up to 5 mo. or refrigerated 5-7 days.
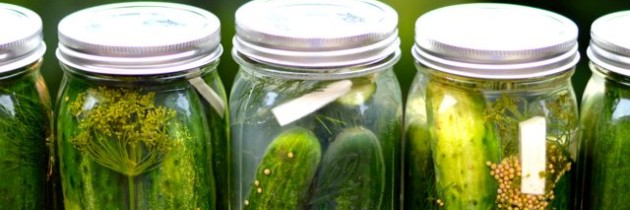
Love my little helper! Crispy fermented dill pickles are so easy to make. I love buying the cucumbers at the farmers’ market, but be sure to look for the pickling rather than the slicing variety. I like to make my pickles whole so they don’t become mushy. Pickles taste great on their own, in salads, or on a burger. Fermented pickles are rich in natural probiotics which introduce beneficial bacteria into your digestive system and improving your immune system. Eating fermented foods will help your body absorb more nutrients from the foods you eat.
Basically, all you need is a sharp knife, wide mouth quart mason jar with two part lid, 1 tablespoon measuring spoon, cutting board, and your ingredients.
Wash cucumbers well, cut and place in jar. Cucumbers should fit tightly. It may be helpful to put the jar on its side to pack the cucumbers.
Combine remaining ingredients into measuring cup and mix. Pour over cucumbers. Add more water if necessary to cover the cucumbers.
The top of the liquid should be 1 inch below the top of the jar and it should cover all of the cucumbers. Tighten the lid.
Cover loosely with a towel in case there is overflow and allow to sit at room temperature, undisturbed for at least 3-4 days. Check to see if the vegetables are “done” by pressing down the center of the lid. When the lid is tight, the process is finished.
Place in the refrigerator. Pickles can be stored for 6-8 months.